Many of us lack the funds or resources to build a home lab with physical hardware, yet we still need hands-on experience with industry-standard tools. This step-by-step tutorial demonstrates how to build a SIEM home lab using just three virtual machines in VirtualBox.

Requirements:
- 8 GB of RAM (preferably 16 GB)
- 250 GB of storage (preferably 500)
- VirtualBox
- Metasploitable 2 VM
- Kali Linux VM
- Red Hat Linux VM
Step 1: Download and Install Splunk Enterprise.
(Note: This first requires the Red Hat Linux VM to have internet connectivity.)
- Open Mozilla Firefox on your RHEL VM.
- Navigate to the Splunk Enterprise Free Trials page.
- Use a company email to begin a free trial.
Test Internet Connection
- Ping a website of your choice to ensure the VM has internet connectivity.
- ping google.com
- If unsuccessful:
- Power off the VM.
- Click the Virtual Machine >Settings>Network
- Go to "Attached To" and select "NAT from the dropdown menu.
Open the terminal and use the wget utility to download the latest Splunk Enterprise package (9.4.3) from the site.
- Login as root using the following command :
- (This step is not recommended in a production environment because it presents unnecessary danger. However, it is safe and most convenient in this isolated VM environment.)
- su -
- Enter Password.
- Download Splunk Enterprise using the following command:
- wget -O <desired Splunk package name> "Splunk download link"
- (Tip: Use the command "ls -ltr" to check and see if the file is there.)
- Install the Splunk Enterprise package
- rpm -ivh <chosen package name>
- (Tip: Use the command "rpm -qa | grep <package name> to see if the package has been successfully installed.)
- Accept License and Start Splunk
- /opt/splunk/bin/splunk start --accept-license
- Create Credentials
Step 2: Network Configuration
- Open VirtualBox.
- Ensure all VMs are powered off.
- Click the Virtual Machine >Settings>Network
- Go to "Attached To" and select "Internal Network" from the dropdown menu.
- Under "Name" select "intnet" or create your own name.
- Repeat these steps for all three VMs.
- In Each VM, open the terminal and enter the following command to allow communication between VMs.
- sudo ifconfig eth0 10.0.2.x netmask 255.255.255.0 broadcast 10.0.2.255
- Use the Ping command to test communication between the VMs
- i.e. ping 10.0.2.x
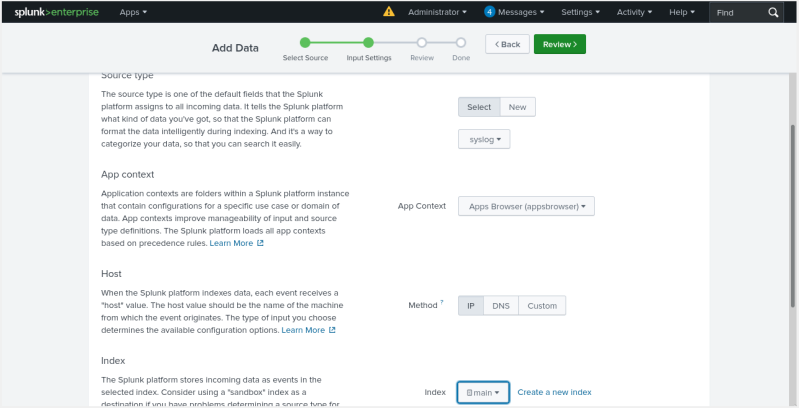
Step 3: Configure Splunk to Ingest Logs via UDP
- Open Splunk Enterprise in your browser.
- Use the credentials you created to login.
- Click Settings > Data Input
- Click "Add New" under "UDP"
- Set the Port to "514"
- Set the Source Type to "syslog"
- Set the Index to "main"
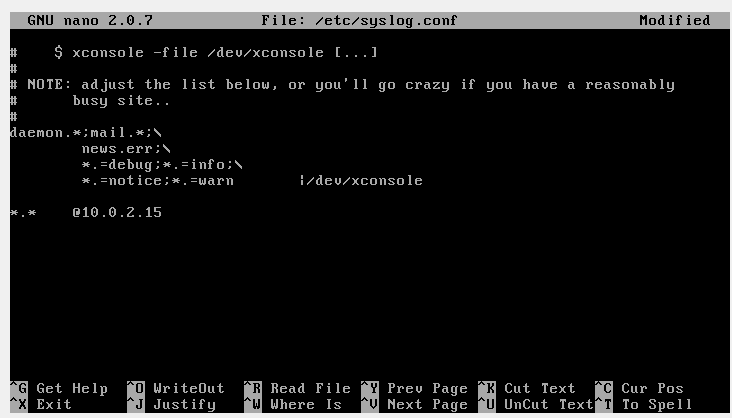
Step 4: Configure Syslogd on Metasploitable 2 to forward logs to Splunk
- Ensure Syslogd is running.
- ps aux | grep syslog
- if not run:
- /etc/init.d/sysklogd restart
- Edit the syslog config file.
- nano /etc/syslog.conf
- Write the following line at the end of the file.
- *.* @<RHEL-ip-address>
- (This tells the VM to send all logs to Splunk using UDP. )
- Restart sysklogd.
- sudo /etc/init.d/sysklogd restart
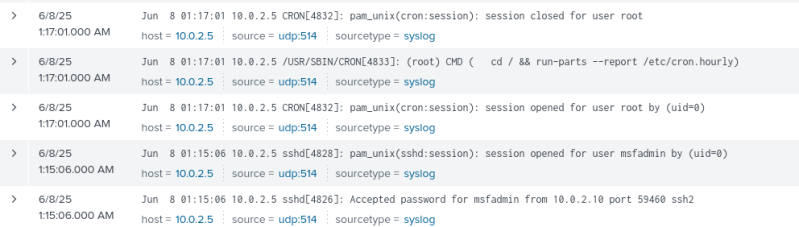
Step 5: Testing
First, we will use the Logger utility which is a command used to write to the system log. Type the following command in the Metasploitable 2 Terminal:
- logger "Testing 123"
Lastly, we will use the Kali VM to connect to Metasploitable 2 via SSH and generate a successful login log.
- Metasploitable 2 uses deprecated host keys and key exchange methods, so run the following command in the Kali terminal to enable compatibility for this exercise.
- (DO NOT replicate this in production environments.)
- ssh -o HostKeyAlgorithms=+ssh-rsa -o PubKeyAcceptedKeyTypes=+ssh-rsa msfadmin@<Metasploitable2_ip_address>
- Open Splunk in the RHEL browser
- Go to Search and Reporting.
- Enter the following commands in the search bar:
- Index=* "Testing 123"
- index=main
Conclusion:
Hopefully, you enjoyed this tutorial on how to set up a SIEM home lab in VirtualBox. Splunk is a powerful, industry-standard tool with capabilities far beyond what we explored here. This guide was designed to walk you through the initial setup process, and I look forward to having you back as we continue to explore the features of Splunk and many other tools.


Create Your Own Website With Webador